Appearance

Getting started
QuestPDF is a modern .NET library for PDF document generation that emphasizes clean architecture and developer productivity. In this tutorial, we'll build a professional invoice document while exploring the core concepts that make QuestPDF powerful and intuitive to use.
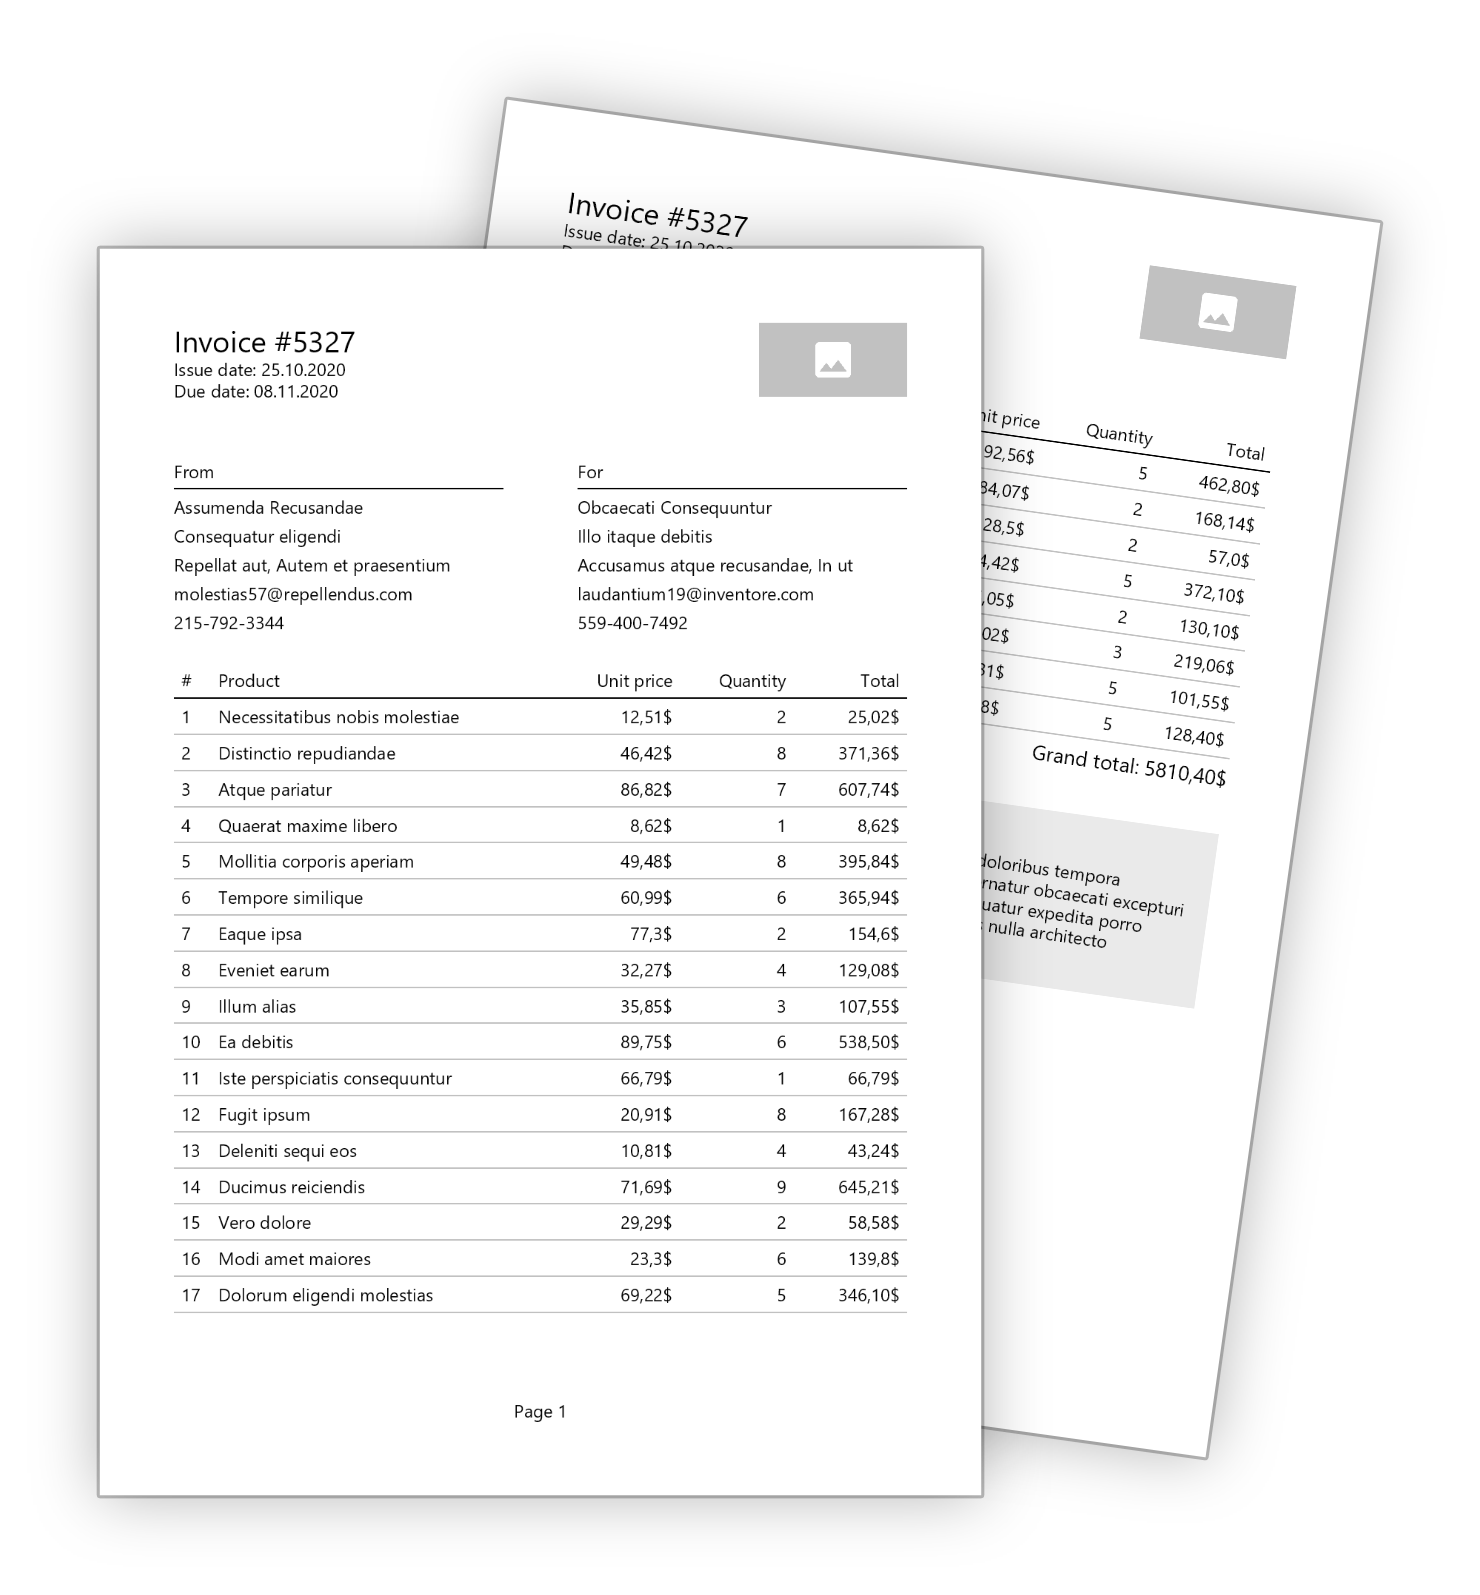
By the end, you'll have a fully functional, paginated invoice generator that looks like this:
TIP
Before starting this tutorial, please familiarize yourself with the Quick Start tutorial.
You can download, review, and compile the complete example from this GitHub repository.
Suggested architecture
QuestPDF recommends a clear three-layer architecture for both maintainability and clarity:
Document Models - define the raw data that appears in your PDF, such as invoice details or report content. These classes remain free of business logic and focus solely on representing structured information.
Data Source - handle asynchronous data fetching, transformations, and calculations. Here, you perform database queries, map domain entities to the document models, and load external resources (Images) to prepare all the information needed to render the document.
Template - use C# features (such as loops, conditional logic, helper methods) and QuestPDF Fluent API to design the visual layout and appearance of your document.
Document models layer
First, let's define the data structure for our invoice. These models capture all the information we need to display:
c#
public class InvoiceModel
{
    public int InvoiceNumber { get; set; }
    public DateTime IssueDate { get; set; }
    public DateTime DueDate { get; set; }

    public Address SellerAddress { get; set; }
    public Address CustomerAddress { get; set; }

    public List<OrderItem> Items { get; set; }
    public string Comments { get; set; }
}

public class OrderItem
{
    public string Name { get; set; }
    public decimal Price { get; set; }
    public int Quantity { get; set; }
}

public class Address
{
    public string CompanyName { get; set; }
    public string Street { get; set; }
    public string City { get; set; }
    public string State { get; set; }
    public object Email { get; set; }
    public string Phone { get; set; }
}
Data source layer
Next, implement a class that retrieves and prepares your invoice data. In a real application, this might query a database, download images from storage, or call an external API.
For this tutorial, we'll use a sample data generator:
c#
using QuestPDF.Helpers;

public static class InvoiceDocumentDataSource
{
    private static Random Random = new Random();

    public static InvoiceModel GetInvoiceDetails()
    {
        var items = Enumerable
            .Range(1, 8)
            .Select(i => GenerateRandomOrderItem())
            .ToList();

        return new InvoiceModel
        {
            InvoiceNumber = Random.Next(1_000, 10_000),
            IssueDate = DateTime.Now,
            DueDate = DateTime.Now + TimeSpan.FromDays(14),

            SellerAddress = GenerateRandomAddress(),
            CustomerAddress = GenerateRandomAddress(),

            Items = items,
            Comments = Placeholders.Paragraph()
        };
    }

    private static OrderItem GenerateRandomOrderItem()
    {
        return new OrderItem
        {
            Name = Placeholders.Label(),
            Price = (decimal) Math.Round(Random.NextDouble() * 100, 2),
            Quantity = Random.Next(1, 10)
        };
    }

    private static Address GenerateRandomAddress()
    {
        return new Address
        {
            CompanyName = Placeholders.Name(),
            Street = Placeholders.Label(),
            City = Placeholders.Label(),
            State = Placeholders.Label(),
            Email = Placeholders.Email(),
            Phone = Placeholders.PhoneNumber()
        };
    }
}
Template layer
With data ready, focus on how it should appear in the final PDF. QuestPDF’s layout engine uses a fluent API to define pages, headers, footers, and content sections.
Basic page structure
As the first step, we’ll implement a single page with a simple header, content area, and footer. The class below implements the IDocument interface and uses the Compose method to define the document’s structure.
Each fluent API call creates a container with its own style, size, alignment constraints and layout behavior — making their order important. While most elements are simple containers holding a single child, some advanced elements offer multiple slots to accommodate more complex layouts.
c#
using QuestPDF.Drawing;
using QuestPDF.Fluent;
using QuestPDF.Helpers;
using QuestPDF.Infrastructure;

public class InvoiceDocument : IDocument
{
    public InvoiceModel Model { get; }

    public InvoiceDocument(InvoiceModel model)
    {
        Model = model;
    }

    public DocumentMetadata GetMetadata() => DocumentMetadata.Default;
    public DocumentSettings GetSettings() => DocumentSettings.Default;

    public void Compose(IDocumentContainer container)
    {
        container
            .Page(page =>
            {
                page.Margin(50);

                page.Header().Height(100).Background(Colors.Grey.Lighten1);
                page.Content().Background(Colors.Grey.Lighten3);
                page.Footer().Height(50).Background(Colors.Grey.Lighten1);
            });
    }
}
This initial scaffolding sets up basic sections. You’ll refine them in the following steps.

Implementing header and footer
Implement header and footer of the document using the most common QuestPDF visual, positional, and layout components.
The code also uses local methods to define the header and content sections. This approach produces cleaner code and makes it easier to maintain and understand.
TIP
Please hover your cursor over the code to see the explanation of various API calls.
c#
public class InvoiceDocument : IDocument
{
/* code omitted */
public void Compose(IDocumentContainer container)
{
container
.Page(page =>
{
page.Margin(50);
page.Header().Element(ComposeHeader);
page.Content().Element(ComposeContent);
page.Footer().AlignCenter().Text(x =>
{
x.CurrentPageNumber();
x.Span(" / ");
x.TotalPages();
});
});
}
void ComposeHeader(IContainer container)
{
container.Row(row =>
{
row.RelativeItem().Column(column =>
{
column.Item()
.Text($"Invoice #{Model.InvoiceNumber}")
.FontSize(20).SemiBold().FontColor(Colors.Blue.Medium);
column.Item().Text(text =>
{
text.Span("Issue date: ").SemiBold();
text.Span($"{Model.IssueDate:d}");
});
column.Item().Text(text =>
{
text.Span("Due date: ").SemiBold();
text.Span($"{Model.DueDate:d}");
});
});
row.ConstantItem(100).Height(50).Placeholder();
});
}
void ComposeContent(IContainer container)
{
container
.PaddingVertical(40)
.Height(250)
.Background(Colors.Grey.Lighten3)
.AlignCenter()
.AlignMiddle()
.Text("Content").FontSize(16);
}
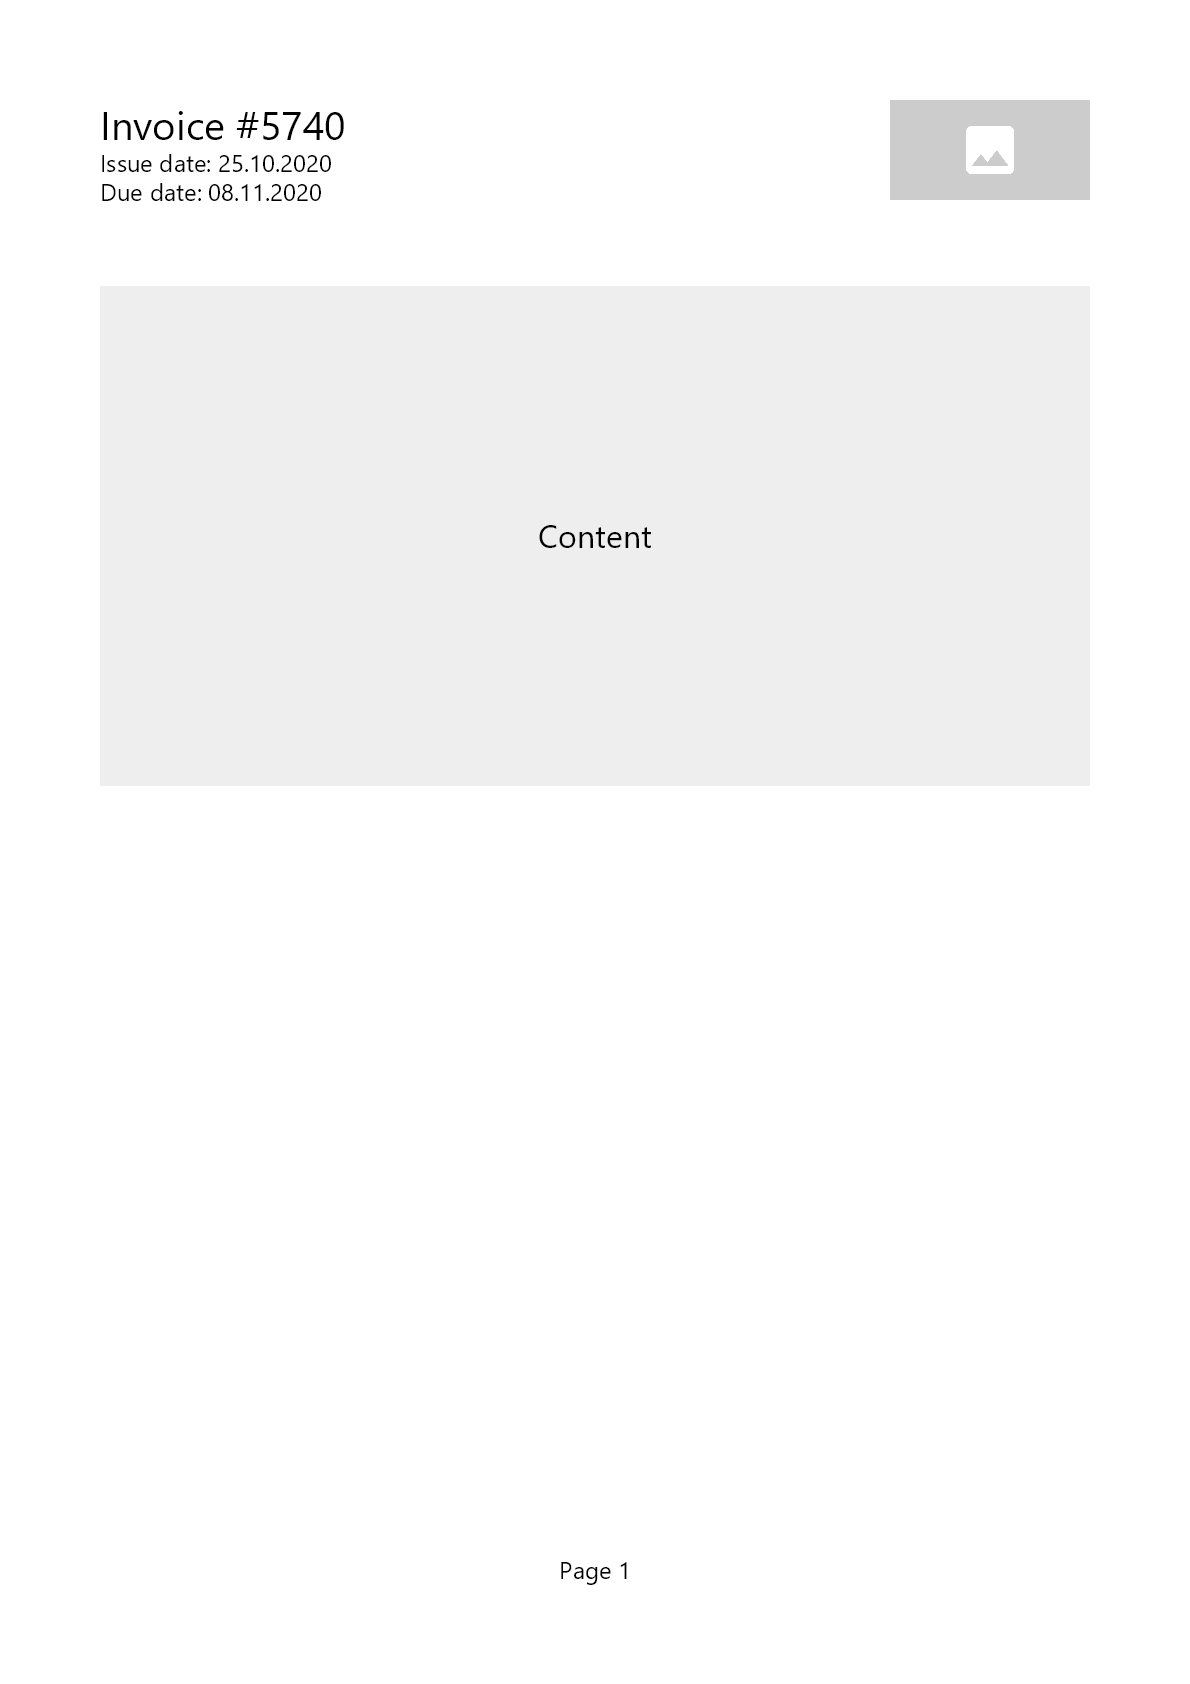
}The code above generates the following output:
Content implementation
Define general structure of the primary content. Please note that you can freely use C# features such as conditions and loops.
c#
public class InvoiceDocument : IDocument
{
    /* code omitted */

    void ComposeContent(IContainer container)
    {
        container.PaddingVertical(40).Column(column =>
        {
            column.Spacing(5);

            column.Item().Element(ComposeTable);

            if (!string.IsNullOrWhiteSpace(Model.Comments))
                column.Item().PaddingTop(25).Element(ComposeComments);
        });
    }

    void ComposeTable(IContainer container)
    {
        container
            .Height(250)
            .Background(Colors.Grey.Lighten3)
            .AlignCenter()
            .AlignMiddle()
            .Text("Table").FontSize(16);
    }

    void ComposeComments(IContainer container)
    {
        container.Background(Colors.Grey.Lighten3).Padding(10).Column(column =>
        {
            column.Spacing(5);
            column.Item().Text("Comments").FontSize(14);
            column.Item().Text(Model.Comments);
        });
    }
}
Here's the result generated by the code snippet above:
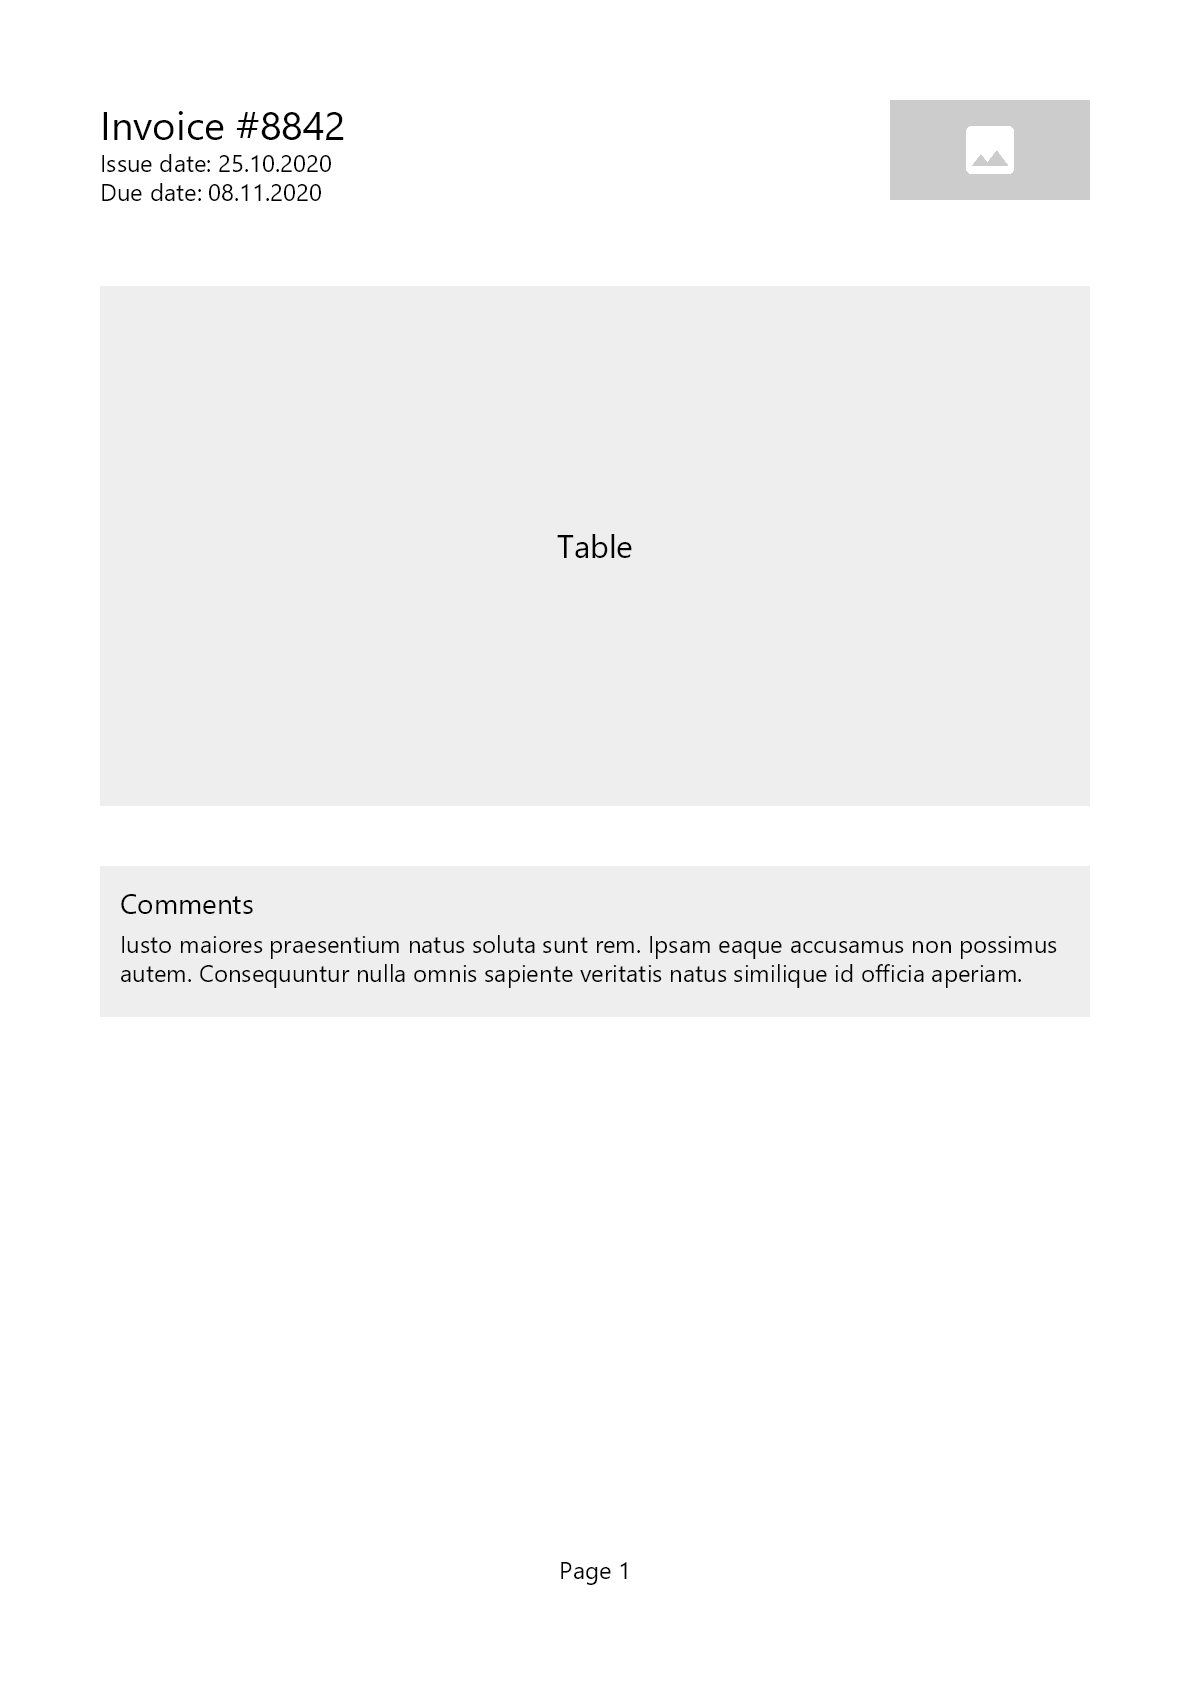
Table generation
Table is one of the most flexible and powerful elements in QuestPDF.
Begin by defining the number, position, and size of your columns. After that, add cells which can be either auto-arranged by the layout engine or explicitly placed at specific rows and columns. You can even have cells span multiple columns or rows.
Note the use of the CellStyle local function, which applies consistent styling to cells in a single, reusable manner.
c#
public class InvoiceDocument : IDocument
{
    /* code omitted */

    void ComposeTable(IContainer container)
    {
        container.Table(table =>
        {
            table.ColumnsDefinition(columns =>
            {
                columns.ConstantColumn(25);
                columns.RelativeColumn(3);
                columns.RelativeColumn();
                columns.RelativeColumn();
                columns.RelativeColumn();
            });

            table.Header(header =>
            {
                header.Cell().Element(CellStyle).Text("#");
                header.Cell().Element(CellStyle).Text("Product");
                header.Cell().Element(CellStyle).AlignRight().Text("Unit price");
                header.Cell().Element(CellStyle).AlignRight().Text("Quantity");
                header.Cell().Element(CellStyle).AlignRight().Text("Total");

                static IContainer CellStyle(IContainer container)
                {
                    return container.DefaultTextStyle(x => x.SemiBold()).PaddingVertical(5).BorderBottom(1).BorderColor(Colors.Black);
                }
            });

            foreach (var item in Model.Items)
            {
                table.Cell().Element(CellStyle).Text(Model.Items.IndexOf(item) + 1);
                table.Cell().Element(CellStyle).Text(item.Name);
                table.Cell().Element(CellStyle).AlignRight().Text($"{item.Price}$");
                table.Cell().Element(CellStyle).AlignRight().Text(item.Quantity);
                table.Cell().Element(CellStyle).AlignRight().Text($"{item.Price * item.Quantity}$");

                static IContainer CellStyle(IContainer container)
                {
                    return container.BorderBottom(1).BorderColor(Colors.Grey.Lighten2).PaddingVertical(5);
                }
            }
        });
    }

    /* code omitted */
}
Address component
To prevent duplication and improve maintainability, move recurring sections into reusable components. For example, addresses often appear multiple times with the same layout. By implementing IComponent, you can pass arguments and reuse this logic throughout your project.
This approach is similar to extracting code into methods, but it goes further. Components reside in their own classes and files, making it simple to provide arguments and fully encapsulate their layout logic.
c#
public class AddressComponent : IComponent
{
private string Title { get; }
private Address Address { get; }
public AddressComponent(string title, Address address)
{
Title = title;
Address = address;
}
public void Compose(IContainer container)
{
container.Column(column =>
{
column.Spacing(2);
column.Item().BorderBottom(1).PaddingBottom(5).Text(Title).SemiBold();
column.Item().Text(Address.CompanyName);
column.Item().Text(Address.Street);
column.Item().Text($"{Address.City}, {Address.State}");
column.Item().Text(Address.Email);
column.Item().Text(Address.Phone);
});
}
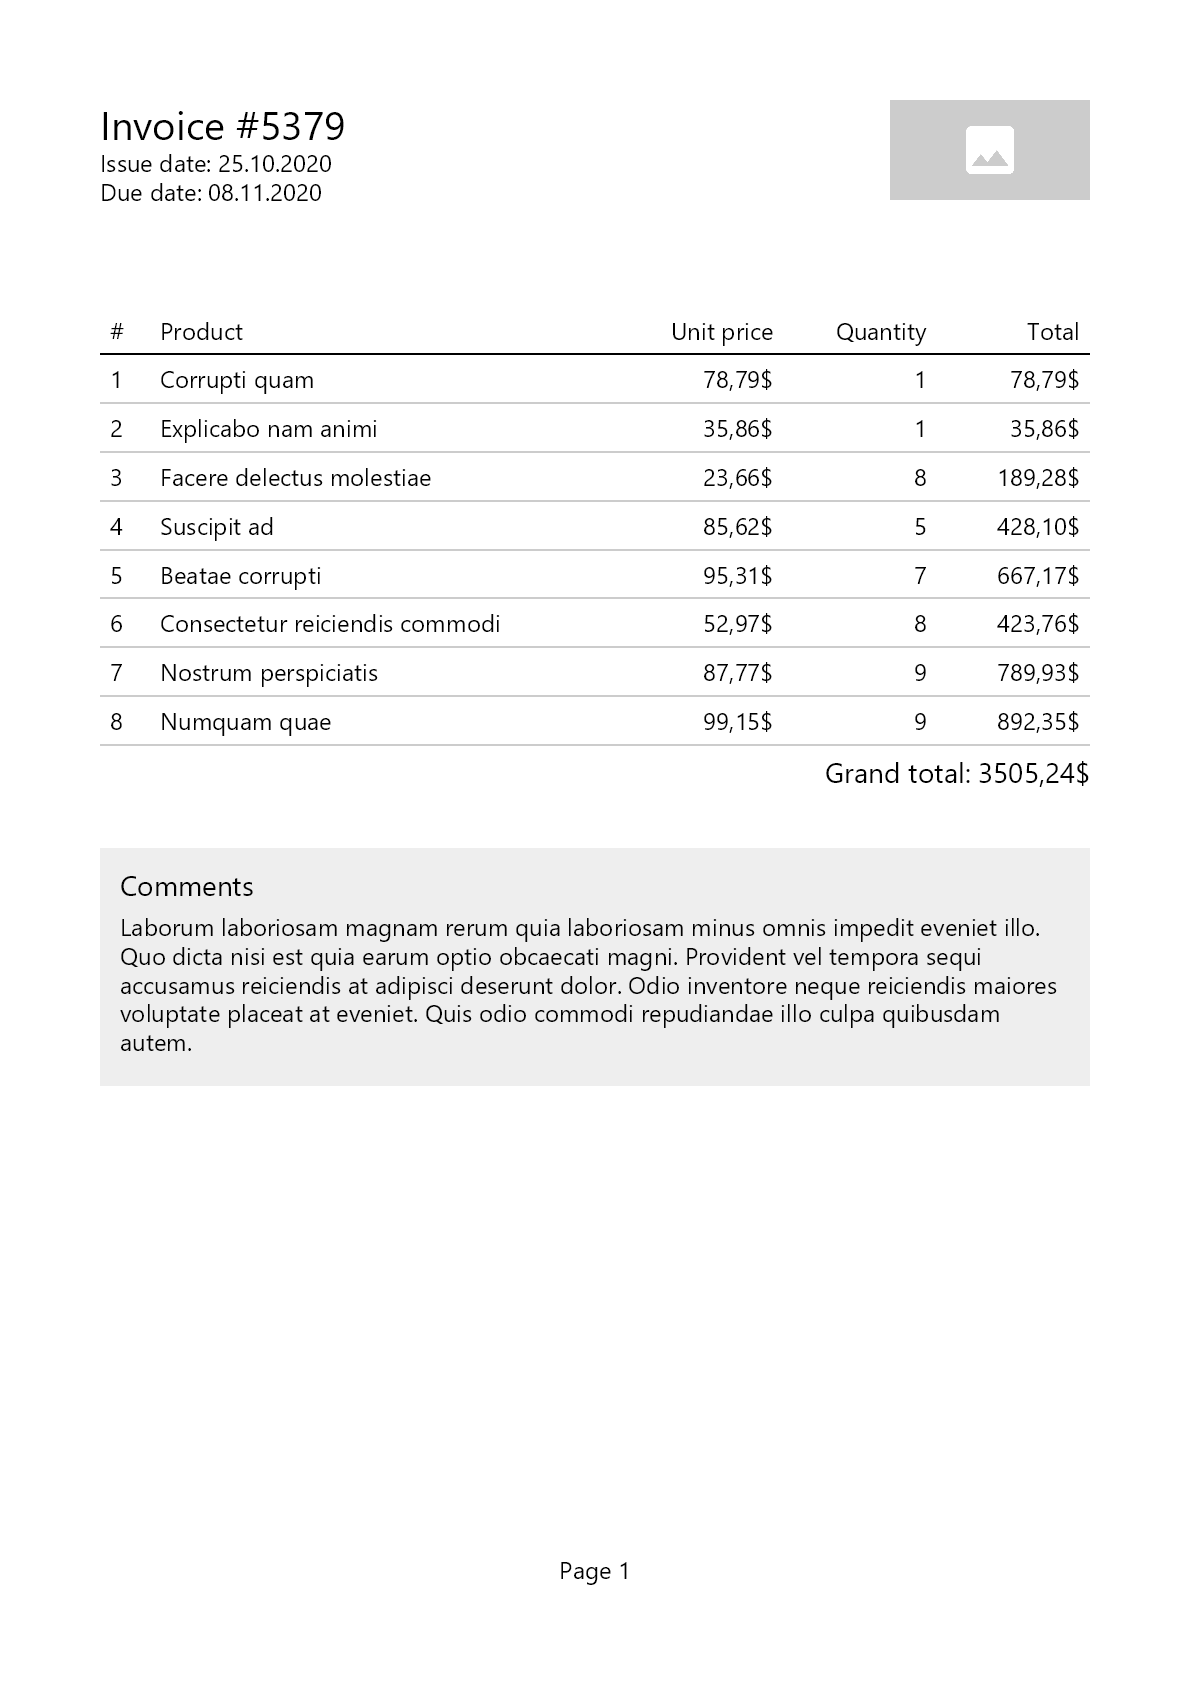
}The code below demonstrates how to integrate and use the newly created component:
c#
public class InvoiceDocument : IDocument
{
    /* code omitted */

    void ComposeContent(IContainer container)
    {
        container.PaddingVertical(40).Column(column =>
        {
            column.Spacing(5);

            column.Item().Row(row =>
            {
                row.RelativeItem().Component(new AddressComponent("From", Model.SellerAddress));
                row.ConstantItem(50);
                row.RelativeItem().Component(new AddressComponent("For", Model.CustomerAddress));
            });

            column.Item().Element(ComposeTable);

            var totalPrice = Model.Items.Sum(x => x.Price * x.Quantity);
            column.Item().AlignRight().Text($"Grand total: {totalPrice}$").FontSize(14);

            if (!string.IsNullOrWhiteSpace(Model.Comments))
                column.Item().PaddingTop(25).Element(ComposeComments);
        });
    }

    /* code omitted */
}
Generating document
Use the following code to generate the document:
c#
using System.IO;
using QuestPDF.Drawing;
using QuestPDF.Fluent;
using QuestPDF.Infrastructure;

static void Main(string[] args)
{
    var model = InvoiceDocumentDataSource.GetInvoiceDetails();
    var document = new InvoiceDocument(model);
    document.GeneratePdfAndShow();

    // document.GeneratePdf("invoice.pdf");
}
SUSTAINABLE AND FAIR LICENSE
By offering free access to most users and premium licenses for larger organizations, the project maintains its commitment to excellence while ensuring sustainable, long-term development for all.
The library is free to use for any individual or business with less than 1 million USD annual gross revenue, or operates as a non-profit organization, or is a FOSS project.
TIP
For learning and evaluation, you can use the free QuestPDF Community license.
More details can be found on the QuestPDF License and Pricing page.